Thursday, July 19, 2012

An Adjustable Belt In No Time!


Part of my son's school uniform is a belt.  In fact, he is required to have his shirt tucked in every day so the belt will be showing so there will be no cheating!  LOL!

The uniform store had some belts but none that were adjustable.  So what happens when he hits a growth spurt?  I get to buy more belts?? I'm just too cheap for that...

I got the idea how to make an adjustable belt when I saw a dog collar that didn't have an opening, just a slide to adjust the size.  So you just adjust the collar to put it on Fido, then make it smaller so that he can't get it off.

Insert light bulb turning on here.


I found all of my supplies from different Etsy sellers - 1 yard length of 1.25" wide cotton webbing here in this shop; military style belt buckles, matching end caps, rectangle loops, and three bar moveable sliders here in this shop.  I first planned to sew the webbing, but I just happened to have my glue gun out so I thought, "hey, why not glue it?"  Lazy, I know...  but it works!

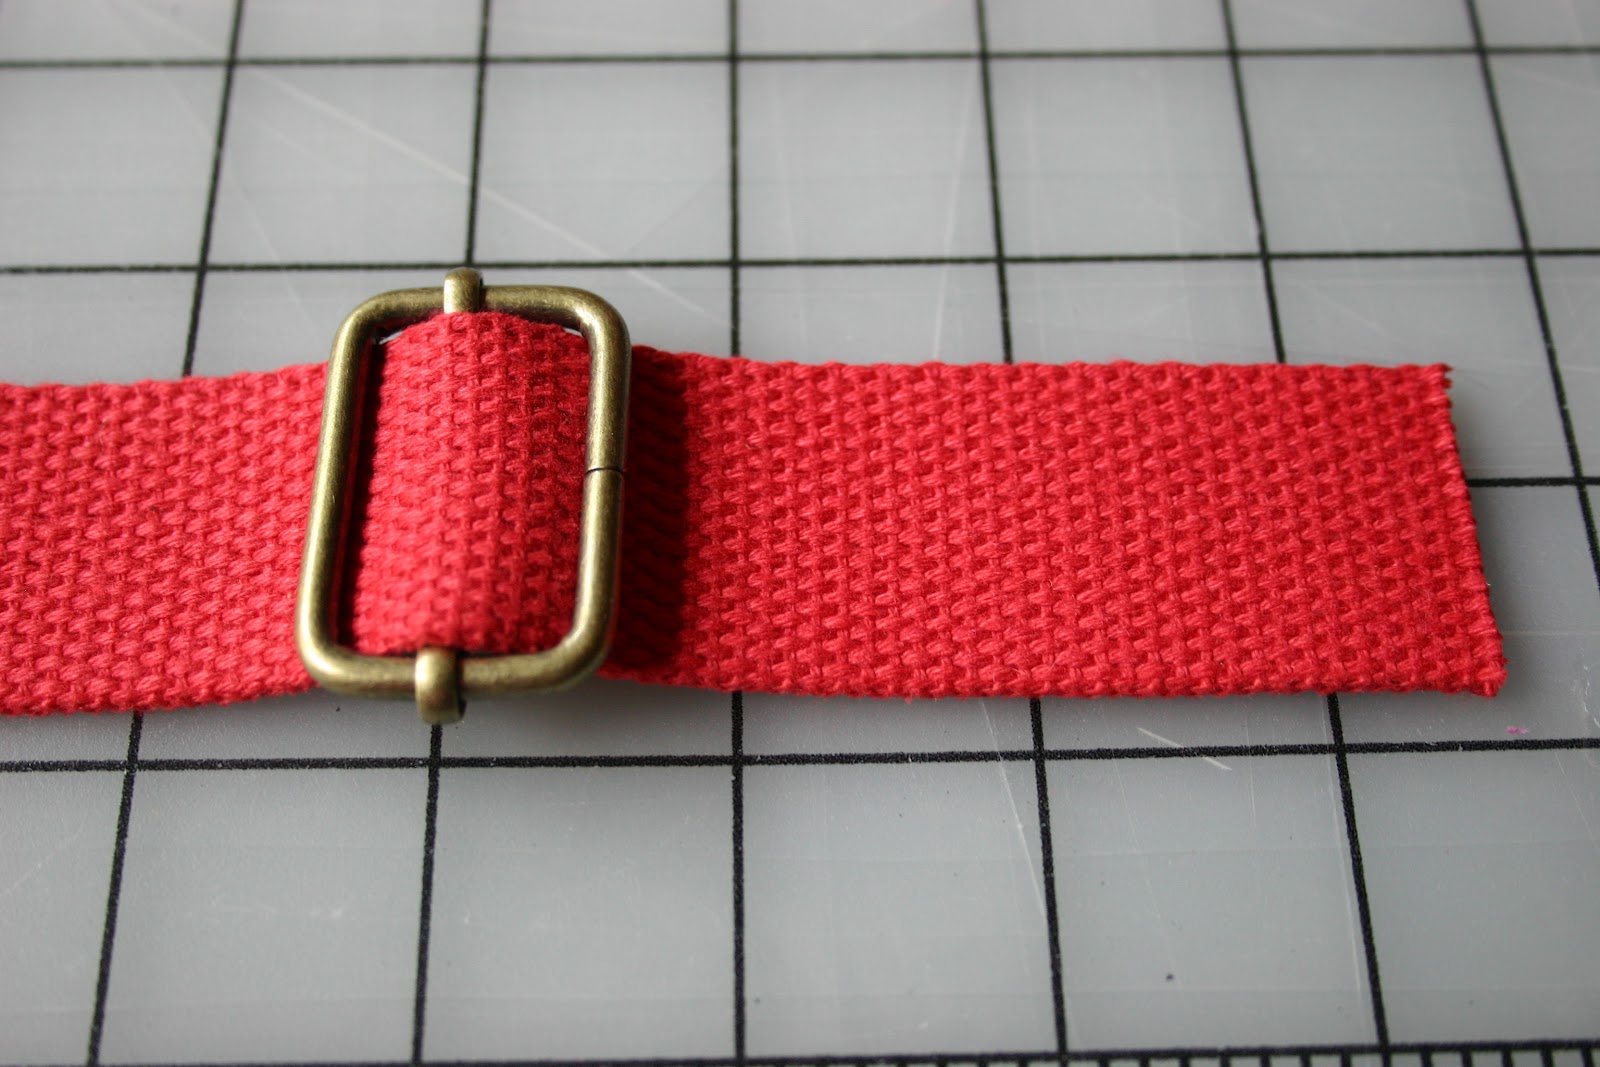
Step One - Cut 3 inches off of one end of your webbing and insert it into the part of the belt buckle that just clamps down and holds it in place.  You may think like I did that this may not hold the webbing tight enough and that it could come undone but I pulled on it quite a bit and it stayed in place.


Step Two - Put the other end of the 3 inch piece of webbing in the rectangle loop.  Put a thick line of hot glue on the end and fold it over.  Hold it in place until it dries.


Step Three - Take the other piece of webbing and put the three bar slide on it so that the middle bar does not show.


Step Four - Turn it over so that the middle bar DOES show and slip the rectangle bar over the end (make sure that the buckle is up-side-down).


Step Five - Fold the end over and tuck it under the middle bar of the three bar slide.  Pull enough through so that you can glue that end over the middle bar.


Step Six - Put a thick line of hot glue on the edge of the end and fold it over the middle bar.


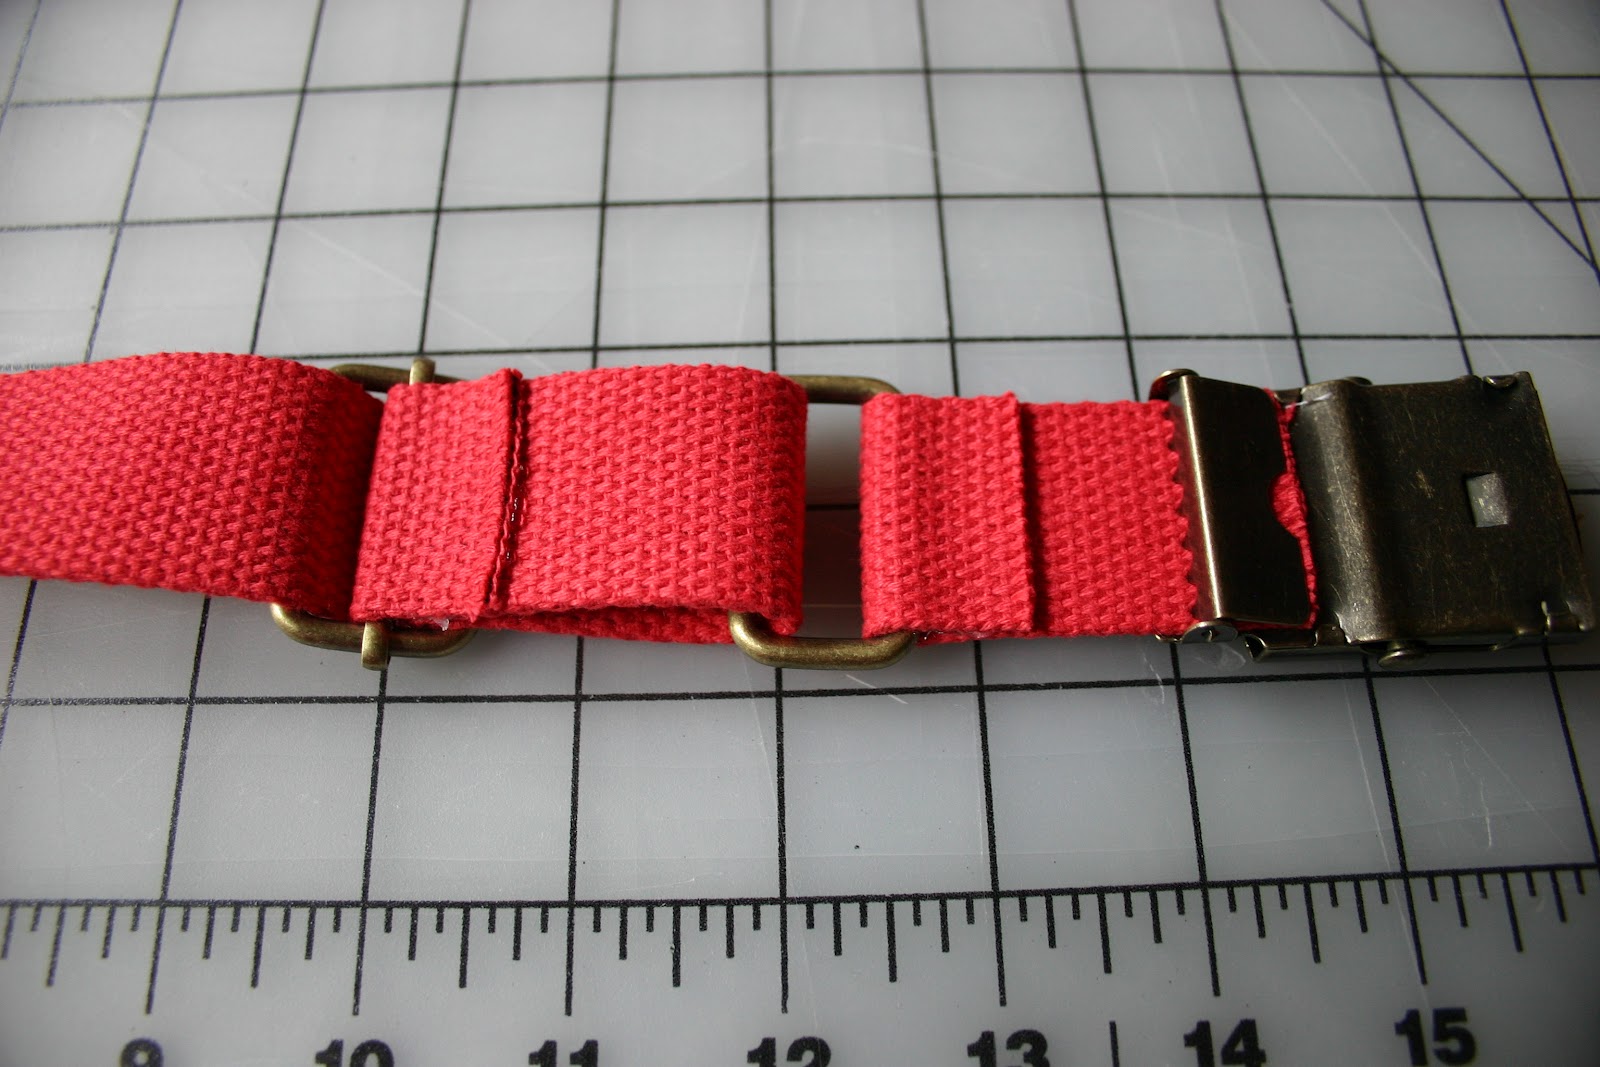
Step Seven - Fold the end cap over the remaining raw edge of the cotton webbing and hammer in place.


Now you can adjust the belt as big or small as you need it to fit.


Cotton webbing comes in different widths and lots of different colors.  I originally wanted to get a stripped pattern in red, khaki, and navy, but mine have to be plain.  :-(  School rules!  Oh well, at least I won't have to buy my son any belts for a while.

Friday, July 6, 2012

A Vegetable Garden Journey - Leave Your Troubles at the Gate

"I think you're going to lose interest...".  That's what my hubby said when I told him that I wanted a vegetable garden.  And I don't mind him saying it - we have a strict honesty policy in our house - because he knows that I don't really enjoy flower gardening or landscaping.  My mother could spend hours outside in her flower gardens, but not me.  I didn't like getting my hands dirty and I had other interests that required me to be inside in the air conditioning, like shopping or scrapbooking.

I assured him that I would not lose interest.  "I want to grow my own food", "It will be fun for the kids to plant seeds and watch things grow for us to eat", "It will be like therapy for me with the added bonus of fresh tomatoes".

Then I mentioned renting a tractor digger thing from Home Depot to dig out and level the garden spot in the back yard.  He made some Tim Taylor type grunting noises, and then it was game ON!


I am so lucky to have such a handy husband...  there is very little that he cannot do!  He did all the tractor work and installed the retaining wall with my brother's help.  And here are some before and after pictures -


 Here is "the island" before the tractor dug out the area for the retaining wall.  We call it the island because the ground around it is all grass and that makes it look like an island.  For seven years we've been covering it with pine straw and just ignored it.  It's also a section of our yard that gets a lot of sun AND is pretty close to the house.


The completed retaining wall allowed for a level area measuring 20' long x 8' wide.  Next year we will have to install a small retaining wall at the bottom of the island to keep the dirt from flowing into the lawn.


 The cedar raised bed kit being installed (that's my brother in the photo).  It is only 7" deep so I had to dig in to allow for plenty of root growth.  If you can't tell from these pictures, this is what you call Red Georgia Clay which is LOTS of fun to dig in...  by "fun" I really mean "Royal PITA"!  Really, I thought I was going to die but I just kept reminding myself how much I was going to LOVE having my very own home-grown vegetables.

About the kit - it was the most affordable way to be able to use cedar which is naturally resistant to rotting.  Pressure-treated lumber was not an option for obvious reasons and non-treated wood would not have lasted very long here because of the termites.  If I ever build another raised bed garden, I will probably use something else.  This kit had a few badly warped boards that were un-usable and it was really just too shallow.


 Fast forward a few months - the garden today with a bunny fence and straw mulch.  The straw makes it a little more comfortable to kneel on the ground around the garden.  Oh, how I used to love watching those bunny's hop into the yard from the woods to eat the clover in my lawn...  now when I see them I want to let the dog out to chase them away but we don't have a fenced yard so we'd probably never see him again!  Thankfully the weeds in the lawn keep their bellies plenty full and they have not ventured into the garden.


I utilized "companion planting" for my square foot garden which is planting certain plants near others to either help deter pests or enhance flavor.  Dill and cucumber, tomato and borage, peppers and parsley, etc...  I often referred to this site for its recommendations - http://www.ghorganics.com/page2.html


Outside of the bunny fence, the island slopes down into the lowest part of our yard.  Next year I plan to condition some of the soil here on the hill to plant my zucchini and squash since they need more room than my small square-foot garden allows.  On the far right of the fenced area, there is just enough room for a potato tower.  Here's how I plan to build one next year - http://urbanfarmerseward.posterous.com/potato-towers-and-living-fence-posts  


My zucchini

My cucumber

 Rutgers Tomato with some lemon grass in front

Zucchini again

While I am enjoying the harvest of my summer veggies, I am already planning my fall/winter crop of carrots, spinach, peas, and squash to name a few.  Here in the Atlanta area we have a nice long growing season so there is no reason to not have this garden producing for most of the year!  If you're interested in planning your garden on your computer, I highly recommend this site - http://www.growveg.com/gardenplanner/gardenplanner.html#  Their online planning tool has a low yearly fee of $24, with a free 30 day trial period.  You can save several different plans, make notes, and draw out your entire yard!  It also tells you the best times to start seeds indoors, move plants outdoors, and when to harvest depending on where you live.  I've had a lot of fun playing with it.

So, have I lost interest?  No.  Absolutely not.  I go into the garden almost every day.  I love to see how much my plants have gown.  I look at it and think about how to do things differently next year like planting a lot more green beans and making the cucumber trellis taller.  I watch the breeze gently move the leaves on the cucumber vines and listen to the bees as they hum from flower to flower.  It's like a small refuge that gives me some "me time" to really be present in the moment.  When I'm in the garden, I am thinking about the garden.  Everything else gets left at the gate.

Wednesday, July 4, 2012

Time for a Face Lift

For my blog, that is!  I haven't had a lot of time to write and post what with a new job and a baby... but that's all going to change now.  I have a couple new hobbies that I plan to share - Vegetable Gardening, Vermicomposting, and have gotten back into sewing.

I looked back through my past posts and there is a lot about couponing.  Honestly, I thought about deleting them, but it is a reminder of where I don't want to go again.  I do still use coupons, but not on the same scale and not for crap non-food.  I spend our food budget more at the farmer's markets now and I have a lovely vegetable garden that is starting to produce healthy food for my family.  So, in short, I'm OVER IT!

What you can look forward to - interesting recipes using healthier ingredients, gardening and the joy it has brought into my life, and fun creative up-cycle sewing projects for me and the kids.  As they say in Japan - ikimasho!  Let's GO!